this coronavirus known as Covid-19 is serious business and has brought the world to it’s knees… what can anyone say other than Mother Nature rules and she will have her way if we do not respect her. while we are all are doing our best self quarantine, so as not to spread the virus, there are some silver linings along the way.
for me, i’ve been a one-man shop for the past several years and fortunately i am able to carry on day to day as i always have working in my shop, doing the work i have always done. hardly anyone stops by so i can actually get things done. everything pretty much arrives via UPS or US Mail and is shipped out pretty much the same way, so not a lot of personal human interaction there.
i’ve always been a freak about keeping my hands ultra-clean due to the nature of my work, and so i don’t end up with some clumsy finger print or dirt spot under the clear-coat of a perfectly good paint or powder coat job. so keeping my hands clean is not a new thing. in fact on average i wash my hands at least 20 times a day, hence my dried out sandpaper like hands during winter months.
i live with a pretty great woman who likes to hit the sack at 9, so we don’t go out much and there’s not a lot of person to person interaction or intermingling with people outside our normal circle or daily routine.
while the silver linings of solitude, and being able to focus a bit more than usual, it gets a bit lonely around the shop and i am concerned as im sure many of you are while we all watch from our computer screens to see what the latest casualties, spread, and sanctions of this deadly virus are. all while no one really knows how long this thing will last, the toll it will take, or if there will be a vaccine in the near or far off future. so all we can do is be patient while we sit tight and wait this thing out.
on February 29th, i thought i was gonna have this really fun “leap year sale” – something i don’t normally do, where id get to clear my shelve’s of some really awesome “new old stock”, offer some great deals on other “in-stock” items, maybe make some people real happy, and in the process put some coin in my pocket. to say the least it has been radio silent since week two of this month (March), and believe me i get it, especially after i watch informative videos, like the one im gonna share with you all below…
so for now, all i want to say is something i have always believed, that “what affects one – affects all”, and for the first time in all our lives we actually get to witness this on a global scale where life and death consequences are very real. hopefully we all will have done our due diligence of self-quarantine and avoided this terrible pandemic with minimal casualties or damage to our lives, both financially and physically. hopefully there will be a vaccine and a cure and it will pass swiftly as it came. in the meanwhile everyone be very careful and stay safe as you possibly can and if there is something you need from me know that i keep things pretty damn clean around my shop and im here for you.
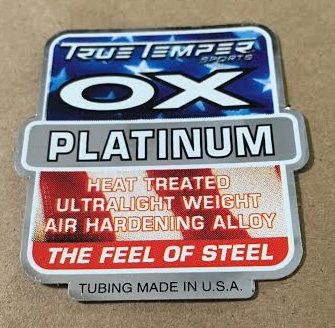
One of the coolest things about being a larger size “small company” was the relationship we had with True Temper Sports and the ability to design our own proprietary tubing, with custom butting profiles, diameters and shapes.
The Kelly/True Temper relationship began when I met a guy named Paul Knox back in 1990 at Interbike. Paul planted the seed by sending me an OX3 mountain bike tube set in which I built my first TrueTemper MTB frame and was amazed.
I built it to the same exact drawing and specs as my previous MTB frames so I could be sure I was running a true comparison of materials. The results were astonishing and I was completely on board from there on out as a True Temper guy.
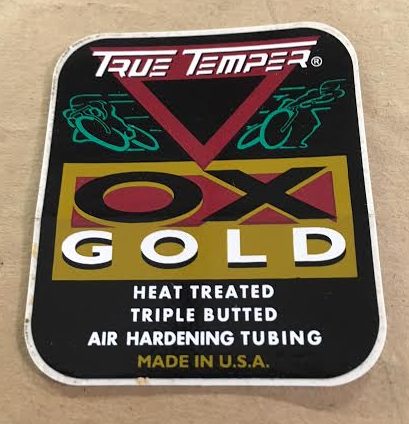
Paul called me up one day somewhere around 1996 or 97 and said they were developing a new material called “OX Gold” and asked if he could send me a few boxes to build with and test the new material. He explained it had a higher yield and tensile strength than the OX3 with a 12% elongation, better memory, dampening and an all around tougher material.
Obviously I said “yes”, and what began as OX Gold was later re-branded as OX Platinum, and the rest is history as far as our involvement and helping to put it on the map with our factory race program and exclusive production program.
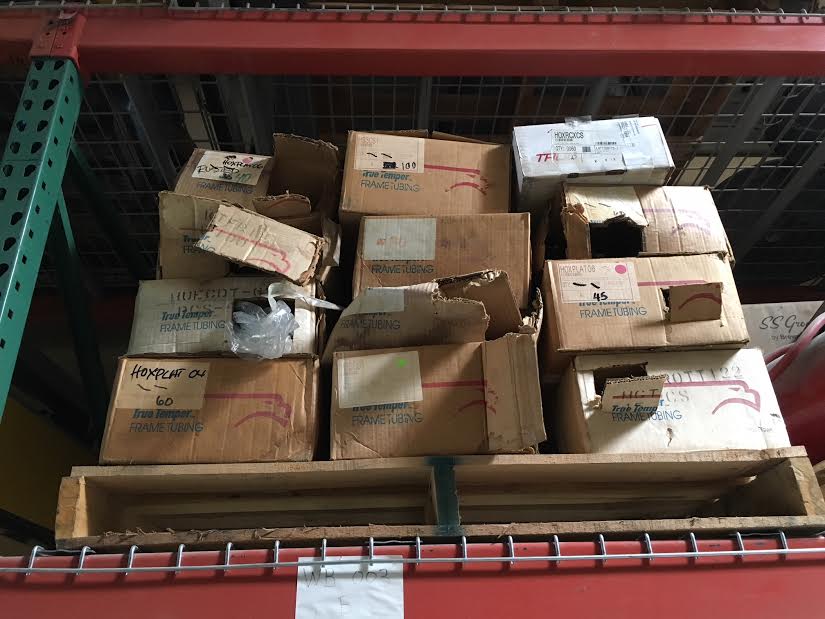
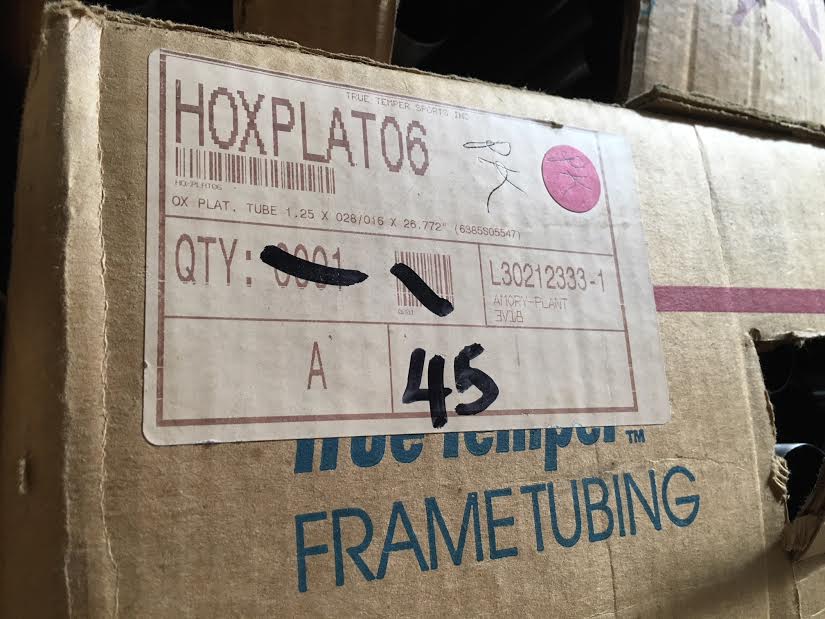
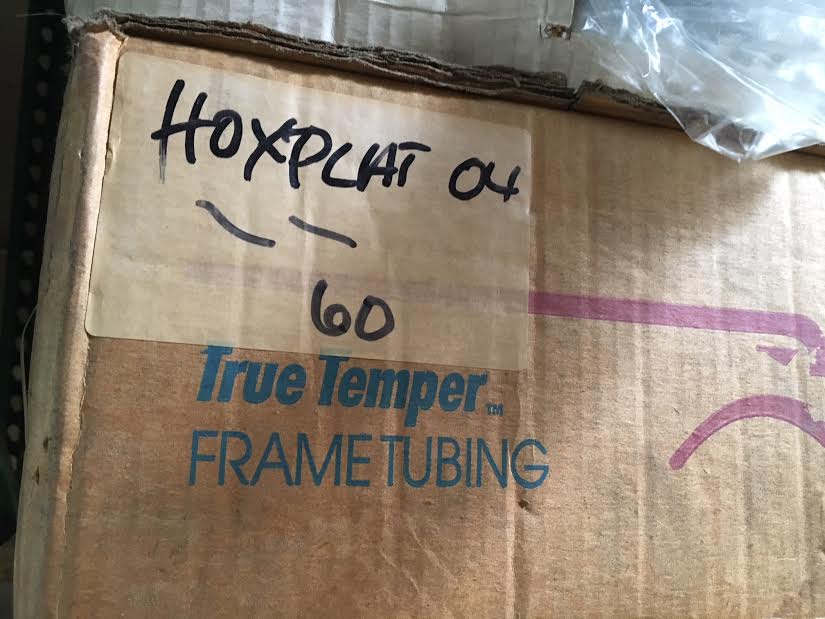
Fast forward to 2016 – True Temper announces its getting out of the bicycle tubing business effective 2017 and what I have left on the shelf is the last of the OX Platinum.
Id say I have about 80-100 main tubes left that I use when im building road and CX style bikes, and after that, there are no more…
So if you’re one of those folks that love the ride of a premium built high quality US steel frame then you owe it to yourself to get in the queue for one of the last Kelly OX Platinum tubed frames as supplies are limited.
There will be a $100 non-refundable queue fee for these special frames, available in custom or production spec – in either tig or fillet brazed construction, with a great amount of attention to detail and care.
One of the biggest mistakes a person can make when re-finishing their bicycle frame that has a powdercoated finish is to sandblast it.
That’s right, it’s the single most common way to absolutely RUIN a lightweight steel, aluminum or titanium frame. The reason why is that most powder has a much tougher surface than the very best wet paint by at least 3 to 5 times, which is why it takes about 3 to 5 times longer to remove it via sandblasting, and why only the most powerful sandblasting apparatus can actually penetrate and remove a powder from any metal surface.
When we were in Oakland we had the luxury of having a really great sandblasting vendor that would sandblast our frames for a very nominal cost and had an incredibly quick turnaround – literally within a day sometimes. They had a pretty big and powerful setup that serviced all the local shipyards and sanitary food manufacturers like Granny Goose and Del Monte, and we would bring them anywhere from 5 to 10 bike frames per week on average. We’d also bring them all the re-finish work that we would do for the general public, be it an older bike frame or any metal object like car rims or household items.
Since all the frames I ever built from 1985 to 1994 were wet painted (by me personally) there was no second-guessing that it was a painted frame and would get sent off to the sandblaster as they always had. But every once in a while we would get a frame that was powder coated and that’s when it became abundantly clear that sandblasting might not be a good idea for removing powder from a frame made of thin steel.
I remember it as clear as day. In early 2001, when we finally went in-house with powdercoating, we sent one of our early team issue cyclocross frames with the Kelly chrome green finish out to blast and when I went to pick it up the first thing my sandblasting guy “Jose” told me was that frame was really tough to blast and that it took him about 45 minutes (usually takes about 10) to get all the powder off. And sure enough, at first glance I could clearly see that it looked like an elevation terrain map, or bare metal camouflage.
So what happened according to Jose was he would spend a bunch of time on one little spot until the powder began to wear away then move right along to the next until the whole frame was bare metal. What he couldn’t see due to the low visibility through his mask (part of a piped in fresh air suit) was the metal was actually being thinned as he was moving along the frame with the high power nozzle and its extremely heavy stream of media. We’re talking at least half the thickness of the metal was removed in places that start out at .016” (.016” x .5 = .008”). It’s pretty simple when you do the math to see there’s not much metal left and catastrophic frame failure is only a matter of time.
Needless to say we ate that frame but learned a valuable lesson and immediately invested in a proper earth friendly chemical strip solution so we could continue to offer our re-powder service without increasing our lead-time.
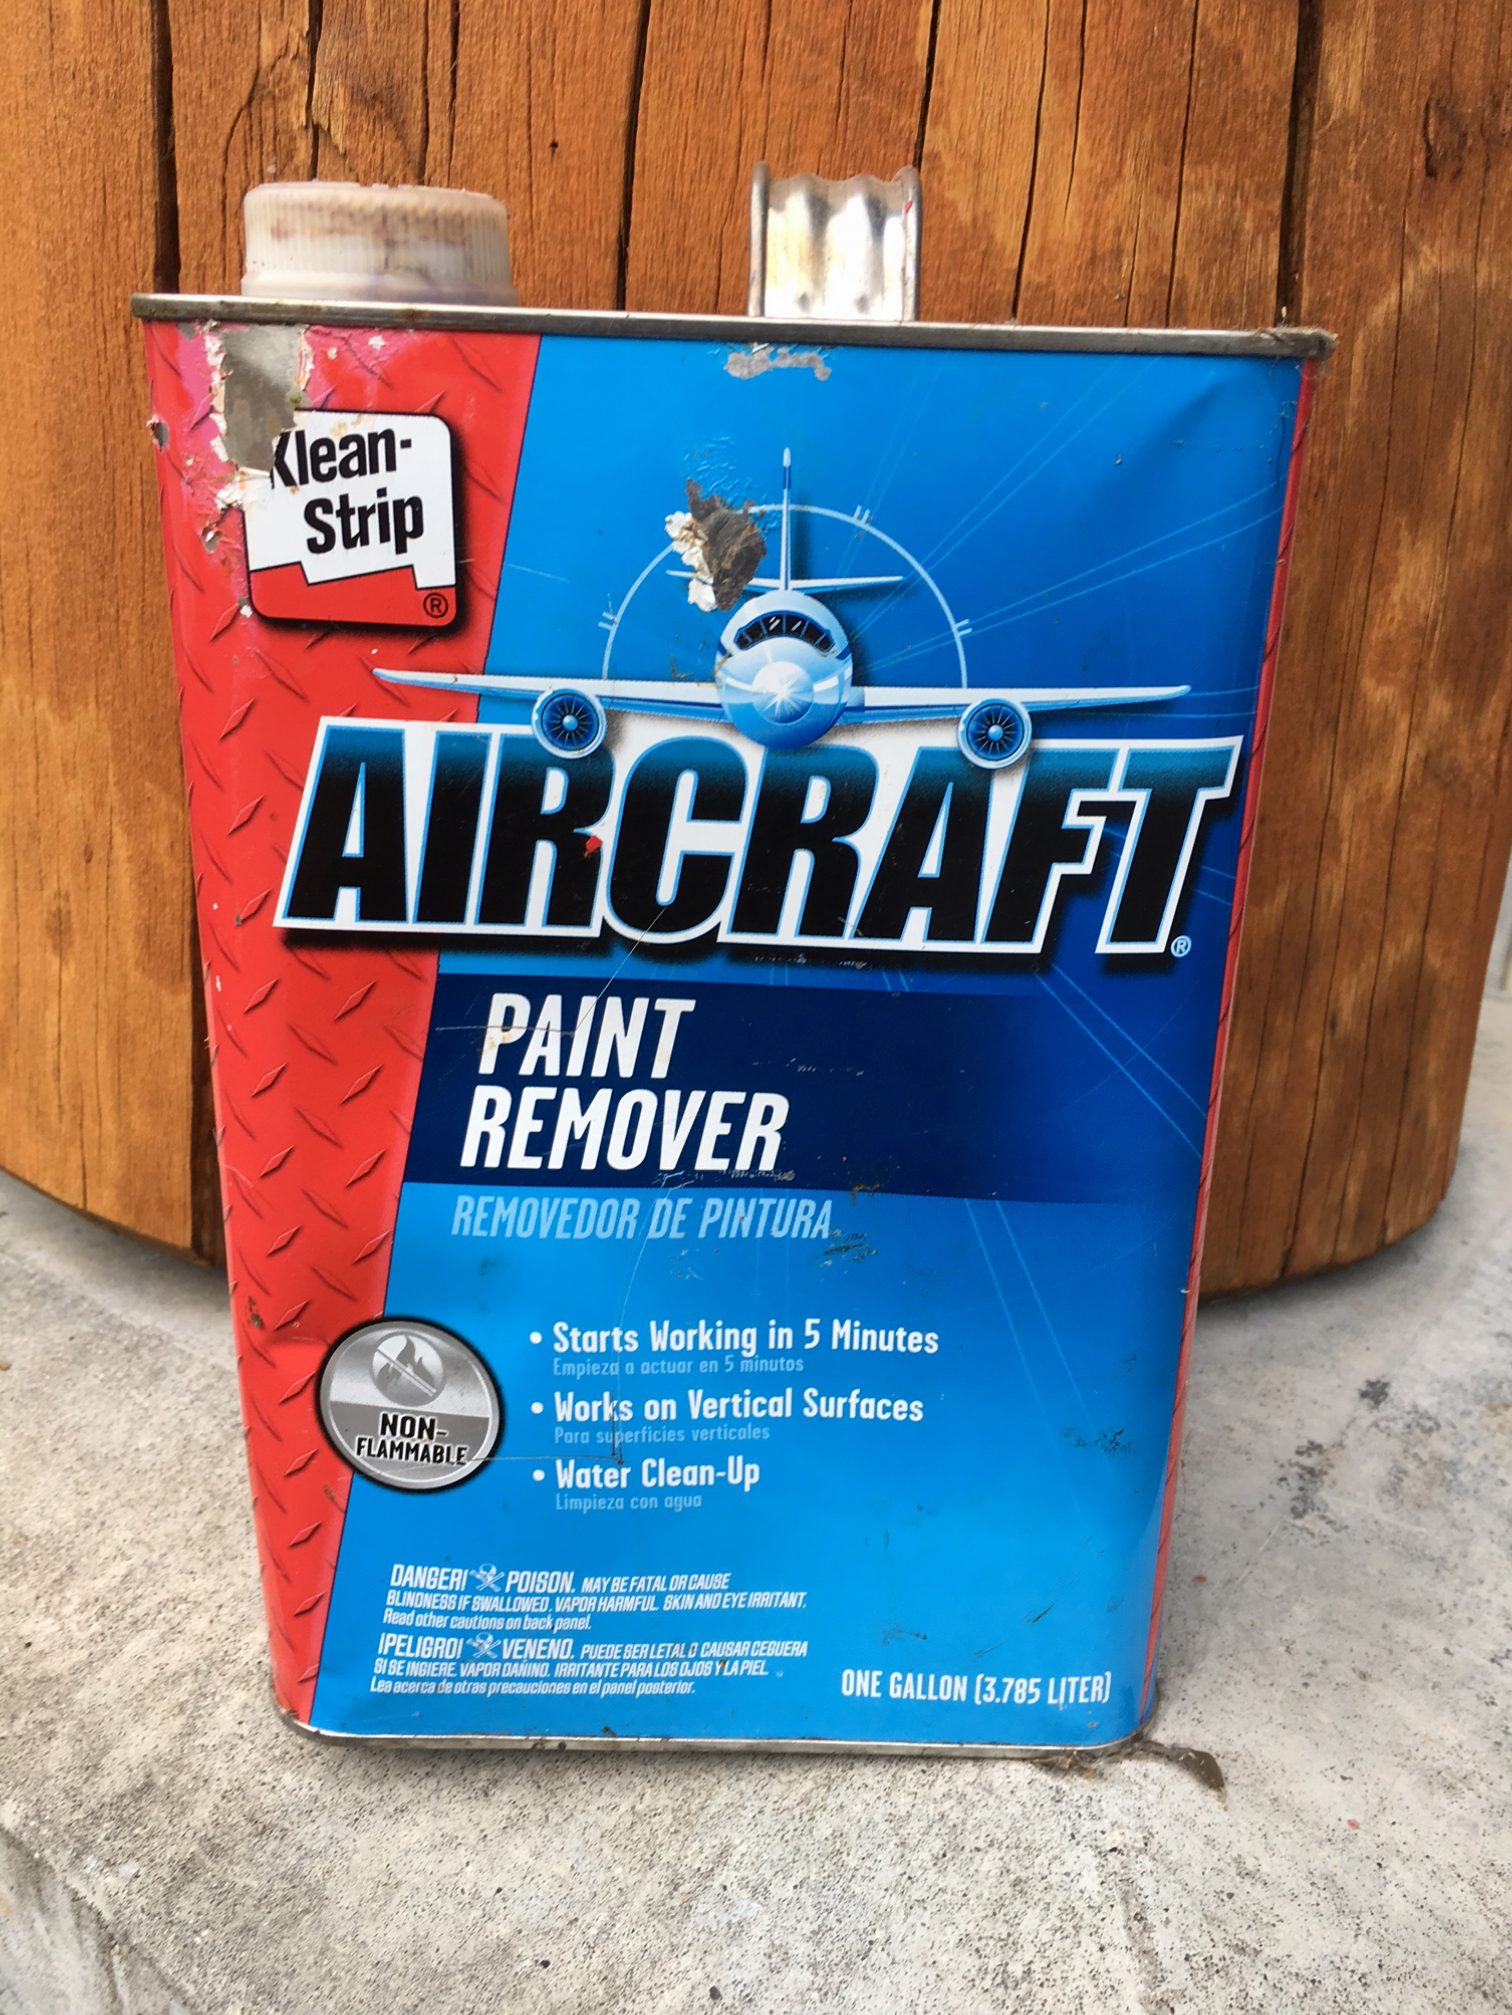
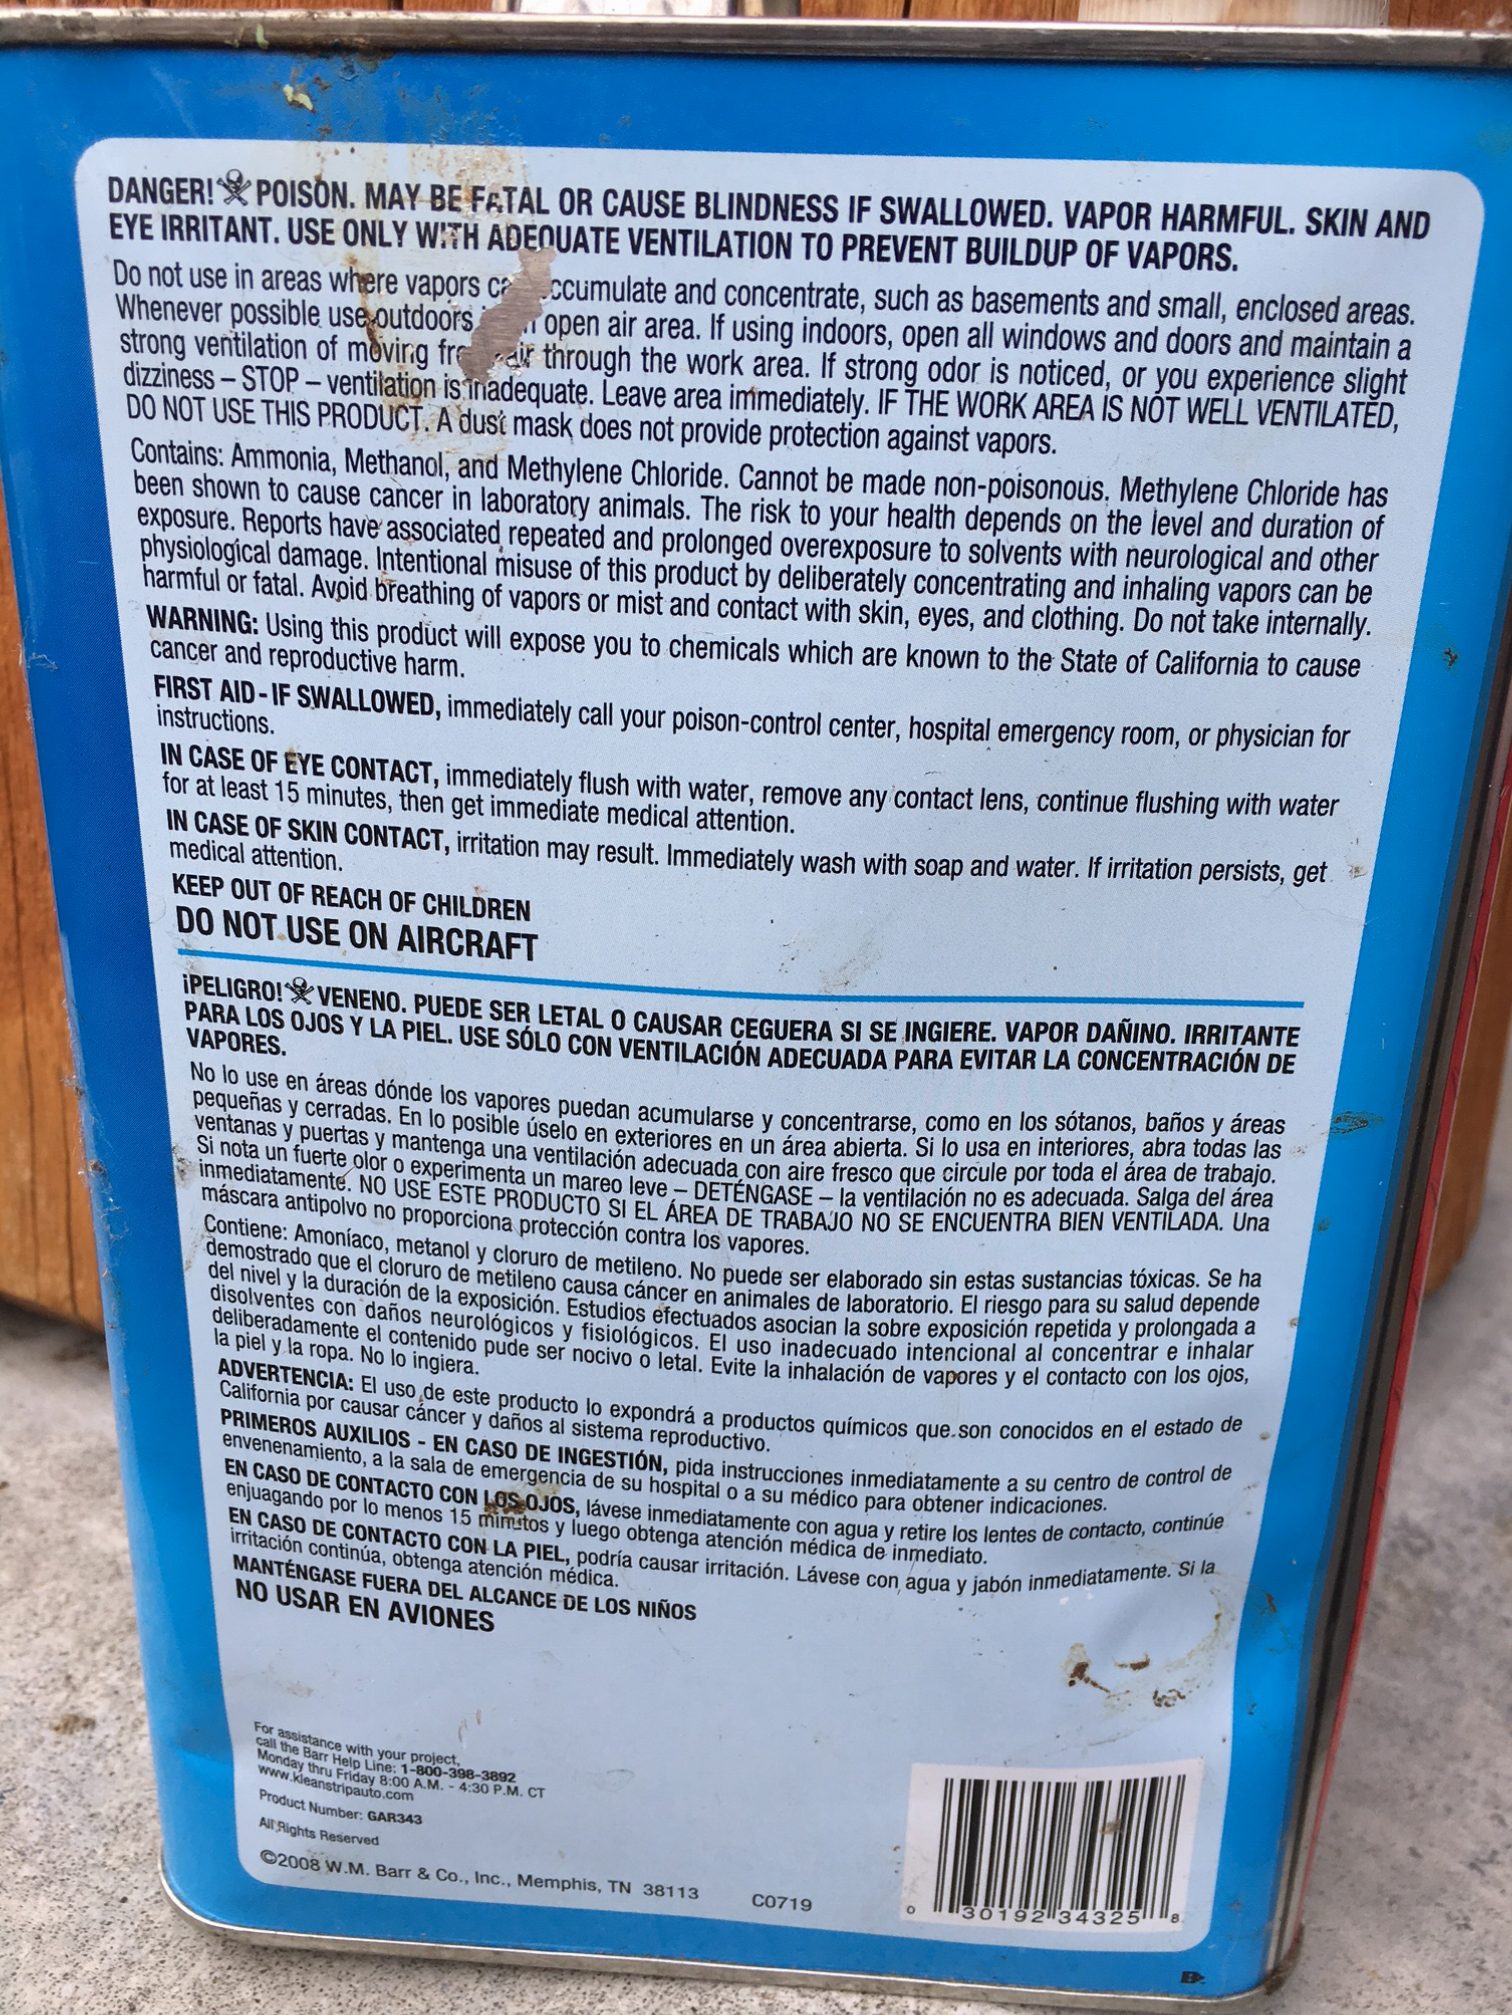
For all you DIY folks out there that want to refinish your powdercoated frames (to which I applaud), or you folks that want to save a buck and have your refinish work done locally, the one thing to remember is the best way to remove powder from a bike frame is to remove it chemically. It’s a nasty and messy job but it is the only way I know of to insure that the integrity of your frame is not compromised. There are lots of different over the shelf paint removal products available at your local hardware or paint store, and as long as it is not corrosive to the metal one is as good as the next.
As well, don’t ever try to burn a paint or powdercoated finish from a bike frame, as that too will completely soften the metal to the hardness of electrical conduit, which will invariably break when you least expect it. This too is a big no-no!
For those of you out there that have sent or are planning to send a frame out to your local powder coater for refinish and plan to slap decals on the frame in order to turn around and sell it, know that it is highly irresponsible not to disclose what the refinish procedure was and that you are selling a ticking time bomb to your unsuspecting buyer that could ultimately cause them great injury or even worse if that frame breaks.
The reason I was motivated to write this article was due to a situation where a person was selling one of my early lightweight frames online that I suspected was sandblasted previous to being re-powdered. I was emailed by the prospective buyer, who was anxious to buy this asked me all sorts of questions about fit, sizing and so on as many folks do. One thing I insisted upon was to be sure to ask if the bike had been sandblasted or chemically striped before it was powdercoated. I also explained that the material used on that frame was originally .4mm (.015”) in the center sections, had most likely been well ridden by the original owner, and possibly the second owner, and could easily be half that thickness after it was sandblasted.
So prospective buyers of any lightweight steel, aluminum or Ti frames beware, and always ask the question, because what lies beneath the surface of a fresh new finish, be it powder or wet paint might tell a different tale.
For those of you who are sending your bike out to be refinished (powder or wet) make damn sure that your painter or powdercoating person understands that your frame is of thin metal and should be chemically stripped – not sand blasted. If they don’t offer a chemical strip option then find someone who does, or better yet, do it yourself*. Don’t be lazy or negligent when it comes to something as critical as jeopardizing the wall thickness of your frame because you or someone you sold the bike to could end up getting hurt, or much worse.
There are a handful of reputable bicycle frame refinishing companies here in the US, and for what you pay having a shop with bicycle frame expertise handling your frame from strip to the last clear coat, versus a metal refinisher that doesn’t will far outweigh the cost of a damaged or ruined frame and most of all your health and wellbeing.
*Disclaimer: no matter what chemical strip solution you use, always read the manufacturers instructions and warnings on the package before use and follow them to the letter. And always (ALWAYS!!!) work in a well-ventilated area, and respect the earth when it comes to cleaning up after you’re done.
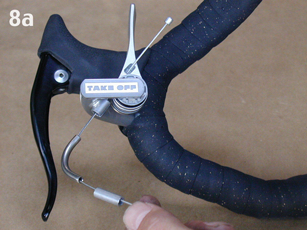
When we launched the new site in mid June we knew there was a lot we needed to follow up with, and TakeOff instructions were at the top of that list.
With the business being so busy its been difficult to set aside the time for a bunch of new pics or videos, so i was looking at a bunch of the old instruction pictures that were taken in our Oakland shop in 1998 (i think) and thought even though they’re a bit small they get the job done.
We will be expanding to a complete instructions page in the near future with new high resolution pictures and videos and you can subscribe to our email list to get the latest on this and whatever else is happening at Kelly.
Or, as always you can call or email us directly and we’re always glad to walk you through it.
here’s the skinny – these “surplus stock” decals are seconds that we decided not to use due to color bleed when mounted on a dark color. they make for a great toolbox, refrigerator, bumper or window sticker. also a nice gift if you know someone named “Kelly”…. ; )
• they measure 11 1/2″ x 1 3/8”
• these are “top mount” stick on decals. to apply simply peel and stick
• price includes shipping anywhere in the continental US
i got an email today from a guy named “Jimbo” (with a bogus return address)…
i know this because when i replied it bounced back as “no such address” (that’s right Jimbo, i do read and reply to all of my emails). besides that, it was addressed to a “John@doe.com”, which i figured was a little fishy in and of itself… but that’s not the point.
what was important about this email was that Jimbo commented that we had a lack of information about our frames and didn’t have all the geo and specs that the old site had. to which i replied: “thanks Jimbo, i am aware of the problems you mentioned. i had a short window of opportunity to get the new site up (with my web guy) and i was being heavily penalized by google because the old site was not mobile friendly – so i just damned the torpedoes and went full speed ahead with the plan to fill in the gaps as i go”.
so there you have it – this new website is a dream and is easy to upload all sorts of information, pictures, and videos.
if you have any questions or comments you can always call 530-362-8004 or email, and i almost always will reply within 24 hours…
thanks for the heads up today Jimbo, and i hope i’ve been helpful…
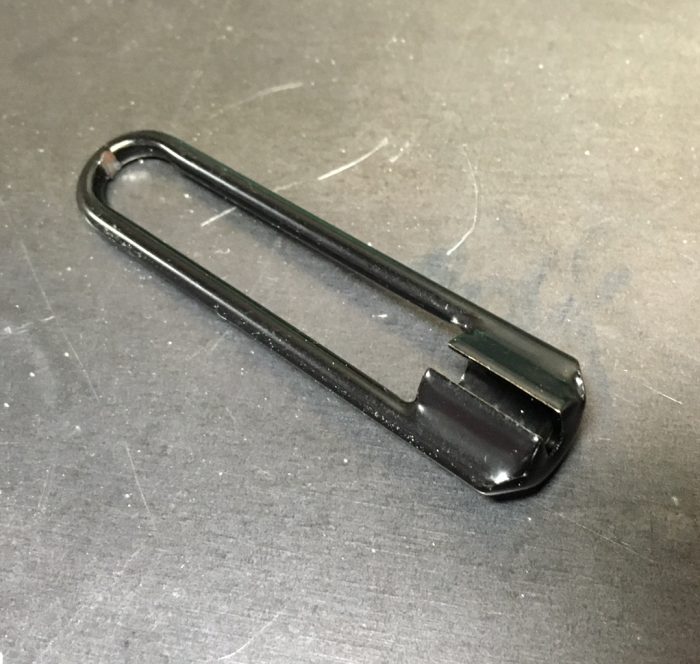
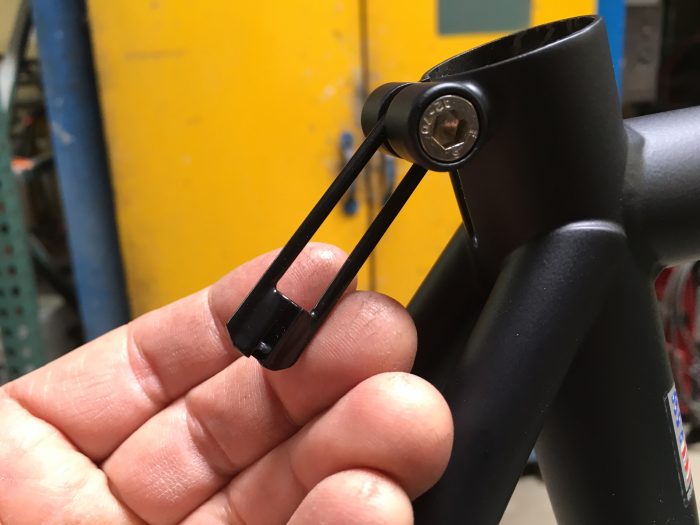
How do you run rear cantilever brakes if there is no cable hanger brazed onto the frame?
simple, you install a Kelly “Canti Basket” on the seat pinch bolt.
its as simple as it sounds. we came up with this little widget back in the late 90’s and its the perfect solution to the problem if you don’t have a cable stop tower already mounted to your seat stays.
the other nice thing about this product is it is easily removable and allows you the flexibility to run a cantilever or v-brake without having to commit to a permanent braze on on the seat stay bridge… a much better solution for those of you who are on the fence, or simply like the cleaner look of less stuff brazed onto your frame.. especially when (not if) it becomes obsolete.
available in black or silver and are available right here for only $15 on the Kelly website on our products page…. get your Canti Basket today!
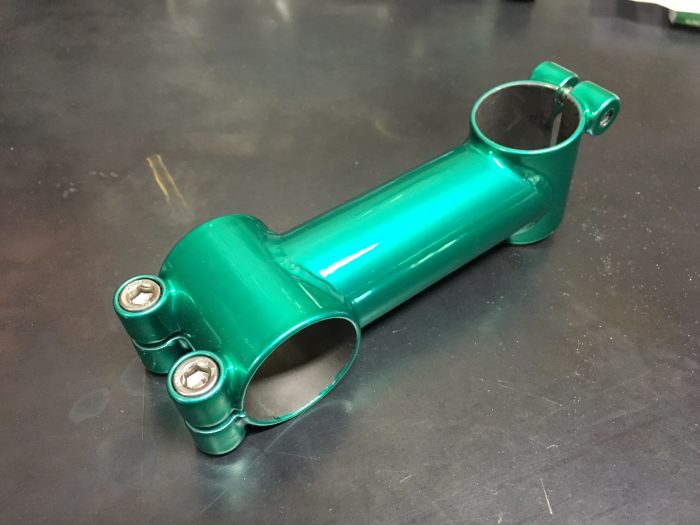
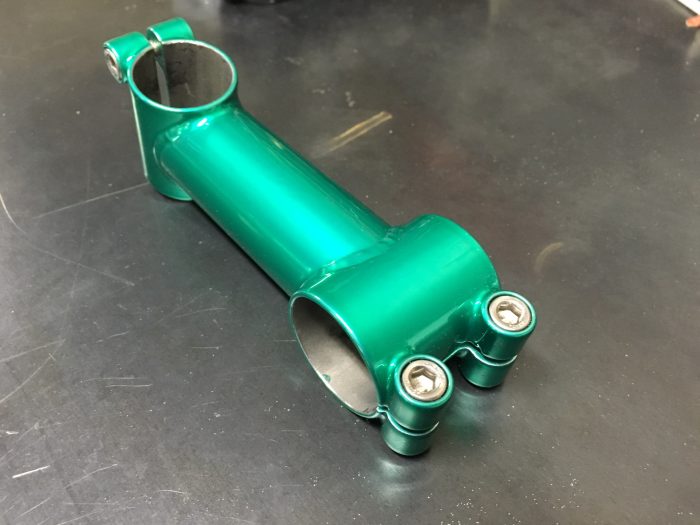
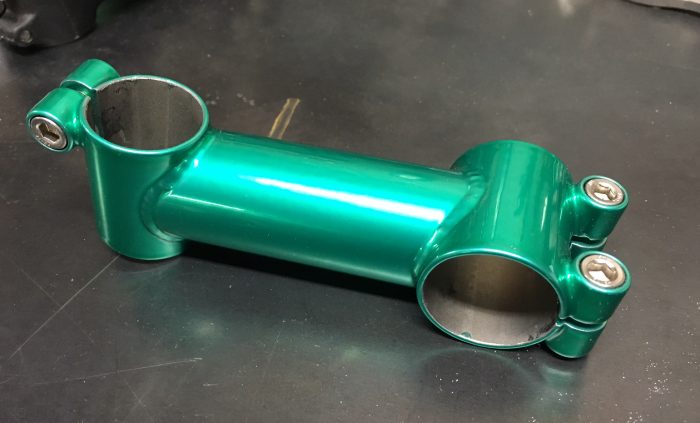
we built this old school custom stem for a guy to run on one of our older 26″ Deluxe mountain bikes. in this new era of removable cap alloy and carbon fiber stems you would think that a steel stem would be obsolete – but thats just not true. given the newer handlebar clamp diameters and designs its very practical to go back to the no-removable cap stem due to its easy fit where the clamp is much bigger so it clears the bends of the newer bars yet has the precise fit where its needed.
here are a few pictures of one stem that will go with the rigid fork that is pictured below on one of our older hardtails… custom stem pricing begins at $150 for black and custom upgrades are always available.
for a quote on a Kelly custom stem email or call (530) 362-8004


 One of the coolest things about being a larger size “small company” was the relationship we had with True Temper Sports and the ability to design our own proprietary tubing, with custom butting profiles, diameters and shapes.
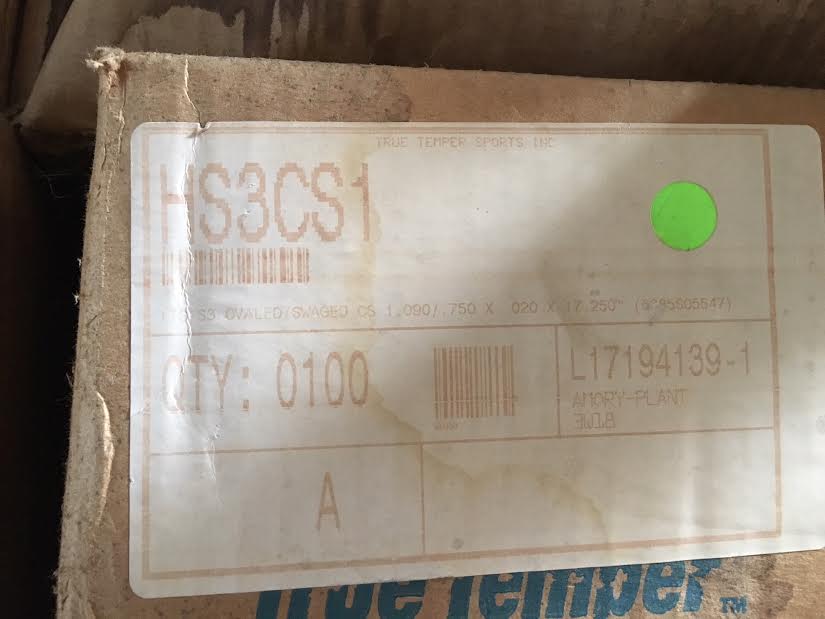
 up with, and
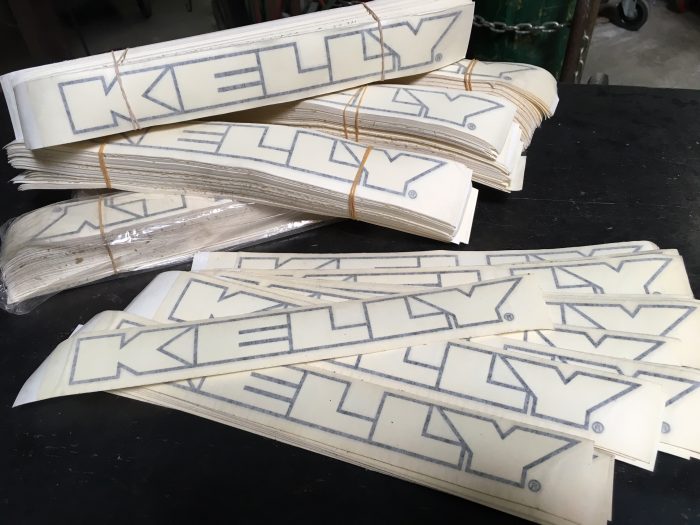
 in this new era of removable cap alloy and carbon fiber stems you would think that a steel stem would be obsolete – but thats just not true. given the newer handlebar clamp diameters and designs its very practical to go back to the no-removable cap stem due to its easy fit where the clamp is much bigger so it clears the bends of the newer bars yet has the precise fit where its needed.